Even though alternating current generators have been around since the 1830s, it was only with the advent of the silicon rectifier that could cost-effectively convert Alternating Current (AC) into Direct Current (DC), that the automotive industry embraced the alternator.
While Ford had fitted an early version of the alternator to power the ignition coil on some Model Ts, it wasn’t until Chrysler introduced the Valiant in 1960 that alternators became standard equipment on series production cars.
The rapid adoption of the alternator over the DC generator was not surprising, given the latter’s functional limitations in automotive applications: At low speed the generator produces very little power, leading to problems such as dimming and flickering of the lights, as well as a lack of charging capacity for the battery. This, coupled to rapid brush wear and the industry’s increasing demand for electrical power, saw the DC generator phased out in a very short space of time.
Although alternator design has not changed much, continuous improvement has seen significant gains in efficiency over the years: Early alternators were, at best only about 50 percent efficient – drawing 1.0 kW from the engine to generate a mere 500 W of electrical power – whereas modern machines operate at over 80 percent efficiency.
So what is it about the alternator that has seen it rule unchallenged for sixty years in automotive applications? To answer this we need to take a look at how the modern alternator produces electrical power. Due to an alternator’s placement, we recommend to degrease up an engine and engine bay before starting with operations with alternator.
Alternator Repair Cost
Before answer on question how much does alternator repair costs, it is important to understand what is an alternator and how does it works (you can read about this below). Why it’s important and what benefits you will get?
- Due to this device construction features, all models of alternators for every, even unique, car model can be repaired. If your auto-mechanic tells, that your car have an exclusive alternator – it’s doesn’t true. All alternators, even for small car, truck or even hauler has the same construction and working principals. The prices not vary a lot too.
- There are lot of automotive repair shops, that can test alternator, disconnect the weared one, renew and deliver you back a fully working device. You can ask for such service option.
- Before repair or buy a new alternator, be sure that your current problem has concern to alternator and has concluded with it. Full testing of the alternator can be performed only in proper location, like an auto-service, your DIY mechanic’s workshop, etc. If your alternator working on less than 70% – you should to buy new one, or make complete test and repair it. How to test and take the alternator apart you can see at the two videos below.
Alternator repair cost depends on the price of the labour and the price of the parts that will be replaced during renewal. Do not be surprised if the labour will more expensive than the parts, due to an alternator design and repair process features. In any case, you can rely on the following costs. A new alternator price usually vary between $180 – $640, so expences will be about $230 in average.
After you having price for a new alternator, try to look for a refurbished. As we mentioned above, alternator repair is the one of the common options, that auto service shops and parts sellers can offer. Refubrished parts depends. You can see different cases here: a brand new alternator, but selled by the price of OEM; new alternator, selled by the manufacturer, that really was refurbished; alternator comes as aftermarket, but it was made really new inside, but not by the manufacturer. This is part of the truth about the cheapest alternators on the market, which you can get acquainted with.
How Does an Alternator Work?
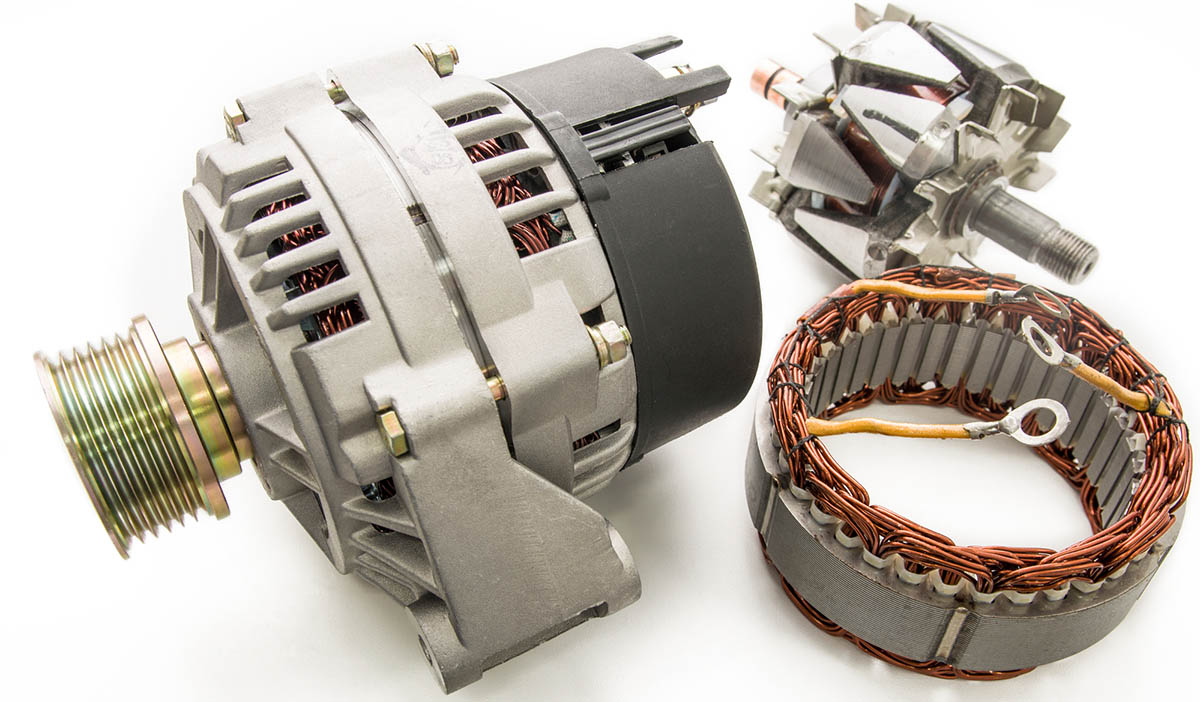
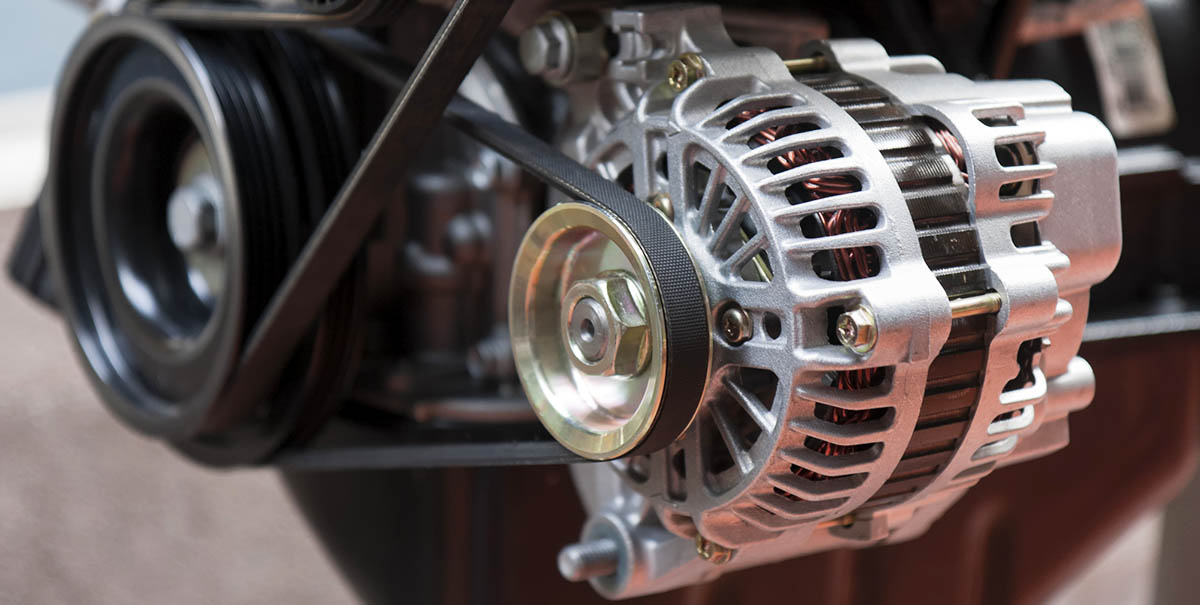
Generating electricity through electromagnetic induction requires a conductor to be moved through a magnetic field; or more accurately, in the case of the alternator – the conductor is held stationary and the field rotates.
When seen in context of a motor car’s alternator, driven from the crankshaft pulley, the spinning rotor serves as the moving magnetic-field.
Similar to permanent magnets, the rotor’s electro-magnets also have a north- and south-pole. In the alternator these are arranged so that alternating north and south poles are evenly distributed around the rotor.
The two ends of the coils making up the electromagnets are wound around the rotor and attached to copper slip rings fastened to two brushes – one going to earth and the other to the field terminal of the voltage regulator.
Energizing the windings magnetizes the spinning rotor, which in turn generates an AC current as the alternating north- and south-poles pass the stationary stator windings.
The stator windings, made up of 3 sets of wires wound at intervals of 120 degrees around a fixed iron core, can be arranged in different formats to achieve specific functional objectives:
- Stators configured for delta connections are arranged in a triangular format to support high current flows at lower rotational speeds.
- Wye arranged stators – also known as ‘Star’ – are named as such because without the neutral, the windings look a lot like the letter Y. Stators of this type are often found in stationary engine applications because of their ability to produce higher voltage than delta stators at very low RPM.
The stator winding terminations are connected to a set of six diodes (two per stator wire) to form what is known as a Bridge Rectifier, the function of which is to convert alternating current to the direct current required to charge the battery.
Terminating in the “B terminal” at the back of the alternator, a heavy-gauge wire conducts the power from the alternator directly to the battery.
To avoid damaging the battery and electrical system it is important that the voltage generated by the alternator be regulated, usually to between 13.5 and 14.5 volts. This is taken care of by the regulator, which in most modern charging systems is built into, or fixed to the alternator.
The regulator adjusts the voltage by controlling the current that creates the magnetic field in the spinning rotor.
This means that when no current is applied to the field, zero volts will be produced by the alternator. Accordingly, if the voltage drops below 13.5V the regulator will apply a current which excites the magnetic field, allowing the alternator to charge. Conversely, when the system voltage reaches 14.5V the regulator cuts the current to the field, thereby interrupting the charge.
On the other hand, current-supply is regulated by the SoC (State of Charge) of the battery: At a low SoC the weak electromotive force (EMF) allows the current to flow from the alternator to the battery. However, as the battery approaches a full charge, the strengthening EMF reduces the current flow from the alternator, while maintaining the voltage within the 13.5 to 14.5-volt range.
A separate circuit in the alternator controls the ‘battery warning light’ in the instrument cluster. Using what is known as the “diode trio” a small portion of the current coming from the three stator windings flows through the diodes so that a positive voltage is produced. On the other side of the diodes, the wires are fused into a single wire, terminating in the “L” connection at the back of the alternator. This is connected to one side of the warning lamp with the other side coming from the “run” position on the ignition switch. Thus, if both sides of the warning lamp receive the same positive voltage, the light will be extinguished. However, if the voltage is interrupted on either side, the lamp will light up.
This is usually the first sign most drivers have that the alternator is not working as it should: The light fails to extinguish with the engine running.
However, there are many more signs of a malfunctioning alternator that a driver should be aware of.
Alternator Problem Signs
The alternator warning light also forms part of the charging circuit, so a light that is fused and does not illuminate when the ignition is switched on will prevent the alternator from charging. Obviously with the engine running the light must go out.
Another visual clue that the alternator, or charging system, may require attention is when the interior, instrument-cluster and headlights dim and flicker at idle, but brighten with an increase in engine speed. This may be a symptom of, not only an under-performing alternator, but could also be caused by a deteriorating battery, poor or corroded battery terminal connections or even a slipping drive belt.
While abnormal lighting behavior or a battery warning light that fails to extinguish are sure signs of a problem, so too are abnormal noises emanating from the engine compartment:
- A high pitched whining noise, whose frequency tracks the engine speed – gaining as the engine is revved – could be an early sign of an alternator bearing failure.
- A screeching noise from the front of the engine that gets louder when the vehicle’s lights are switched on and the alternator increases its charge, could be an early warning that the drive belt requires adjustment or replacement.
Although the muted buzzing of the magnetic flux produced when the alternator is charging is quite normal, a noticeable increase in the noise level – to the point where it may even be heard from within the cabin with the lights switched on – would require further investigation.
With the alternator responsible for maintaining the correct level of charge in the battery any electrical symptoms related to an under-performing battery could ultimately be traced back to the alternator. So, over and above the symptoms described above, an engine that seems sluggish to turn over and fails to start could also indicate an alternator problem.
And finally, the most common symptom of a failing alternator may be a battery that does not appear to hold its charge. This could in actual fact be as a result of an alternator that simply does not deliver sufficient power to fully charge the battery.
Faulty Alternator Diagnosing
While many of these symptoms, such as a maladjusted drive belt or corroded battery terminals, actually have nothing to do with the alternator and are easy to rectify, a faulty alternator requires a proper diagnosis before being repaired or replaced.
Before conducting any on-car diagnosis of the alternator it is important that the drive belt is correctly tensioned.
NOTE: Diagnosing an alternator problem correctly will save time and money
While it is quite possible for an alternator to continue to charge with one of its three phases inoperative it will not supply sufficient power to keep the battery and vehicle electrics operating efficiently. This condition is most likely caused by one or more of the six diodes in the rectifier failing, although a break in one of the windings would produce the same results.
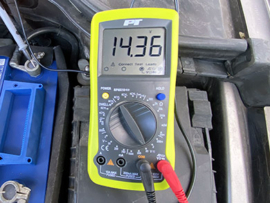
To make sure none of the phases are open circuit requires a simple test with a multimeter, or even volt meter.
This is referred to as a load test and is conducted at the battery. Before starting the test it is important to make sure the battery is correctly charged with the voltage reading approximately 12.6V.
With the instrument set to the 20V DC scale, the red probe must be connected to the positive battery terminal and the black to the negative. With no electrical load (such as accessories and lights) being drawn, start the car and increase the engine speed to around 1,500 RPM – or a speed which ensures the alternator is delivering a full charge. With no load the meter should read between 13.6- and 15.8-volts – If the output voltage is over 16V, it’s very likely the voltage regulator is faulty and requires replacement.
The next step is to measure the voltage under load. This is carried out with the headlights, and all ancillaries that draw electrical power switched on and the engine again turned up to about 1,500 RPM. As with the no-load test, the voltage should remain at between 13.6- and 15.8-volts.
To test for a faulty diode, the voltmeter must be set to read AC voltage and with the engine turning over at about 1,200 RPM, the meter should read 0V across the battery. Any voltage reading above this is an indication that one or more of the diodes has failed.
Having confirmed a problem with the alternator, there is no alternative but to carry out a repair, or in most cases a replacement.
Alternator Repair & Replacement
While it is possible to repair certain alternator faults, such as a failed diode or regulator, in most cases this is not economical or advisable. The cost and availability of remanufactured replacement alternators that come with a warranty, have seen these grow in popularity.
Another problem that the average DIY mechanic faces when coming to repair an alternator is that of accessibility. On modern cars the alternator is usually tucked away behind covers and other ancillary components making it difficult to remove and refit.
But if it is accessible, the process is not complicated:
- Disconnect the negative battery cable
- Loosen the belt tensioner
- Loosen and remove the serpentine drive belt
- Remove the wiring harness or connectors
- Loosen and remove the alternator
- Install the new alternator, ensuring to refit any spacers in the correct sequence
- Refit the drive belt
- Adjust the belt tension
- Reconnect the negative battery cable and wiring harnesses
- Turn the ignition switch to the run position and make sure the check lamp comes on
- Start the car and make sure the warning light extinguishes
- Listen for any abnormal noise coming from the alternator or drive belt
It is important that any issues relating to the alternator and charging system be promptly and effectively diagnosed and repaired. With the modern car bristling with sensitive electronic equipment, something like an over-voltage caused by a faulty regulator can easily lead to an expensive repair bill.


