- 1. To change brake pads by yourself you need:
- 2. What tools are needed to change the brake pads?
- 3. Step 1: Lift your car
- 4. Step 2: Remove the caliper assembly with the old brake pads
- 5. Step 3: Replacing the brake pads
- 6. Step 4: Extend the caliper piston itself
- 7. Step 5: Put the wheel back on the car
Throughout the life of any car, you will be faced with the need to constantly maintain it, which will require a lot of money. But if you learn how to do certain things yourself, that is, to change some of the necessary components in your car, then you can definitely save a lot of money on this. For example, you will be able to personally change the brake pads on your car. Does this action sound quite complicated to you? Don’t scare yourself in advance, but you can find the cost of brake pads replacement from this article.
To change brake pads by yourself you need:
- Loosen all lug nuts of the wheel
- Lift your car
- Remove the wheel from the car by loosening the mounting bolts
- Remove the caliper assembly with the old brake pads
- Replace the brake pads with new ones
- Expand the piston of the caliper assembly itself
- Put the brake caliper back in place and secure it with the bolts
- Install the wheel back on the car
Undoubtedly, replacing the brake pads at first glance looks quite a complicated task. But only at first glance. In practice, everything happens much easier. You just need to know the exact sequence of the process. To do this, we offer a detailed guide on how to replace the brake pads on a car. Try to carefully study the proposed tips and then you will succeed.
What tools are needed to change the brake pads?
Before you get started you will need a few tools. Some of the tools you may find or already have in your home or garage, but some you will still need to buy at an auto parts store. Once you have the whole set, you can change the pads yourself on any car.
In the long run, you will save a lot of money if you constantly change the brake pads on your car yourself. So by spending your money now on the right tools you will automatically reduce the cost of maintaining your car in the future.
- Owner’s Manual: whenever you are going to make repairs to your car yourself, first make sure that you have your car’s manual. Usually, the car manufacturer will have a book like this included with the car. True, most often it does not describe everything in as much detail as we would like. In any case, before you start, you need to know where to place the jack, where to place the supports to hold the car on the weight, as well as a number of other technical things you need to replace the pads.
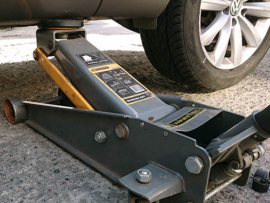
- Jack (floor jack): usually a new car is delivered with a jack, which should be in the trunk of the car. This jack is great for replacing a tire with a spare tire, for example. But not all jacks that come with the car manufacturer are ideal for changing pads. The point here is that the jacks that come with cars are most often not capable of lifting more than 50% of the weight of the entire car, since they are designed to fit one spare wheel. But to replace the pads, you need a jack that can lift and safely hold at least 75% of the car’s weight. Most passenger cars weigh an average of 1-2 tons. If your car weighs this much, then we recommend using a 2 to 3-ton floor jack to replace the pads.
- Jack stands: when you had picked up the car in the air you will need to hold it in this position. To do this, you will need a jackstand (jack stand). Each safety support (as well as the jack) has individual characteristics (load capacity), so when buying these supports, always be guided by the weight of your car. In your case, it is best to choose the carrying capacity of the car safety jacks with a reserve. In this case, it will be correct to buy 1,5-2 ton jack stands.
- Brake caliper adjusting tool: the tool like this, usually it’s a “G-clamp”, make it possible to adjust the brake caliper yourself to match the new brake pads, which are thicker than old pads. Remember that this tool is a 100% must-have. Yes, of course, there are of course many other workarounds and solutions to caliper adjustment, but they will all be less effective and very inconvenient when compared to using a special tool to adjust the brake piston in the caliper.
- New brake pads: you need new brake pads which fit your car. You can use an online part selection site (such as Amazon) knowing the model and year of your car. Also, your lover auto store can quickly find the right brake pads for your vehicle by using the VIN number.
- Brake rotors (if needed): it often happens that you need to replace the brake rotors on your car along with changing the pads. The pads and brake discs will wear out over time, but they usually do not wear out at the same time. Brake rotors have a longer service life than pads. In the Owner’s manual or in the repair book of your car you will definitely find information about the minimum thickness of the brake discs. Then, when you remove the wheels to replace the old pads with the new ones, be sure to measure the thickness of the brake discs. If their thickness is below the minimum allowable value listed in your car’s Owner’s manual, then it’s time to replace the old brake rotors with new ones.
- Brake grease: to make brakes work well and easy, apply brake grease to the surface of the brake pads (between the pads and the calipers) and to the slide pins (which works on every brake pedal operation). One of the best brake and caliper greases you can find over here.
- Socket wrench: most cars are not likely to use an impact wrench for this operation, due to the location of the caliper fixing bolt, so a socket wrench suits better. You will need this to remove the brake caliper.
- Wheel wrench or power impact wrench: the wheel wrench is going with any car obviously, and usually you can find it in the trunk. In order to loosen all lug nuts of the wheel, a power impact wrench or wheel wrench will be needed.
- Some details for your car: brake pads changing isn’t a difficult operation. But some car models may have different brake system designs. So if you encounter a problem like this, which is that everything on your car looks different than what you have in your manual, please check your car’s Owner’s manual, where you can find out more details about this part. If in this car manual something will be not clear and understandable to you, do not worry, a lot of useful information you can get directly on YouTube, where most likely you will find a video on the replacement of the pads on a particular make and model of the car you are interested in, without any problems.
Step 1: Lift your car
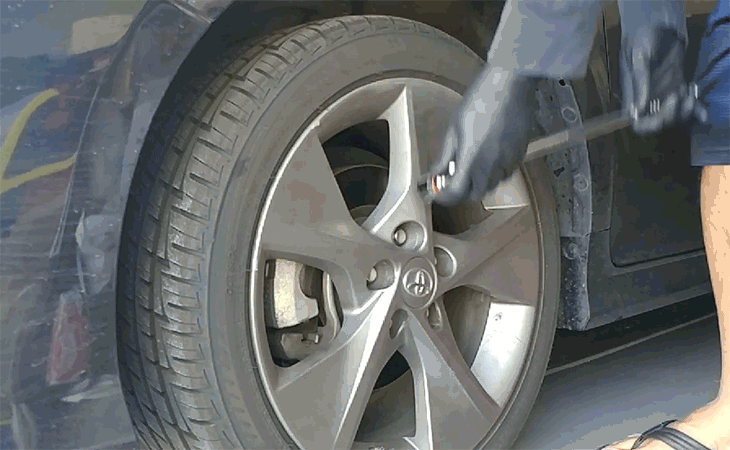
In order to get to the brake pads, you first have to remove the wheels from the car. If you have ever changed a spare wheel before, you should be familiar with the first part of the process. The first thing to do is to loosen the wheel nuts a little bit with the wrench or power wrench you have. At this point, you don’t have to loosen the wheel nuts completely, just loosen them a bit. Loosening the wheel bolts before lifting the car is very important so you don’t have to loosen them when the car is raised and the wheel is simply rotating around its axis.
Next, after you have loosened the wheel bolts, it’s time to lift the car. Your Car Owner’s Manual should detail where it is unsafe to place the jack itself under the car. Some cars have special pads for mounting both the jack and the jack stands.
Once you have the jack installed and placed it in the right place under the car, then you can lift the car.
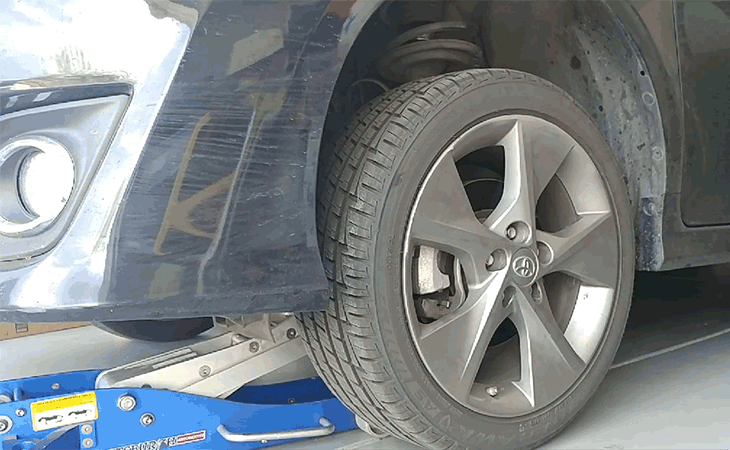
Next, after raising the car to the desired height from the floor, quickly place the jack stands under the car. You must place each stand under the structural part of the car body. Again, please refer to your car’s Owner’s Manual for more accurate placement of the jack stands.
Once the jack stands are in place, slowly and gradually lower your vehicle until it is safely supported on the stands themselves. Then you can remove the jack.
Now you can completely unscrew all the wheel bolts and remove the wheel from your vehicle.

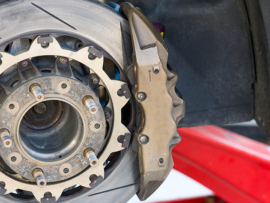
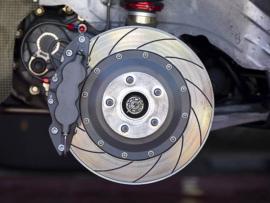
Step 2: Remove the caliper assembly with the old brake pads
After the wheel is removed, you should see the brake rotor and brake caliper assembly. The caliper assembly itself acts like a clamp, it compresses the brake pads, which are pressed against the brake disc. This action is what causes the wheel to slow down. Your job is to use a socket wrench to unscrew the bolts (it can be one or two bolts in most cases) on the back of the caliper.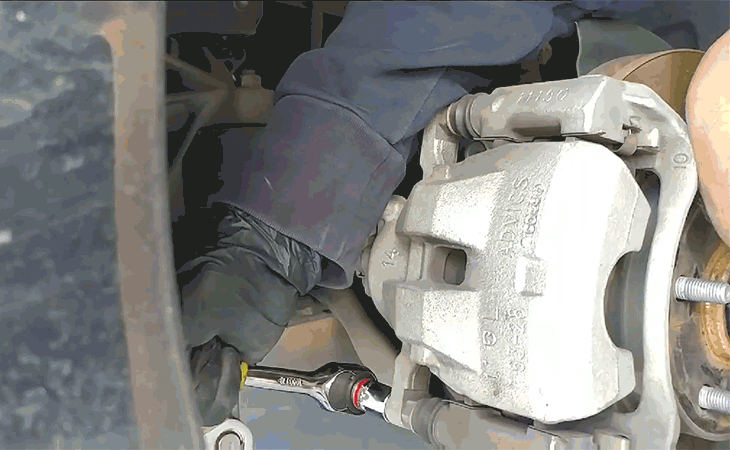
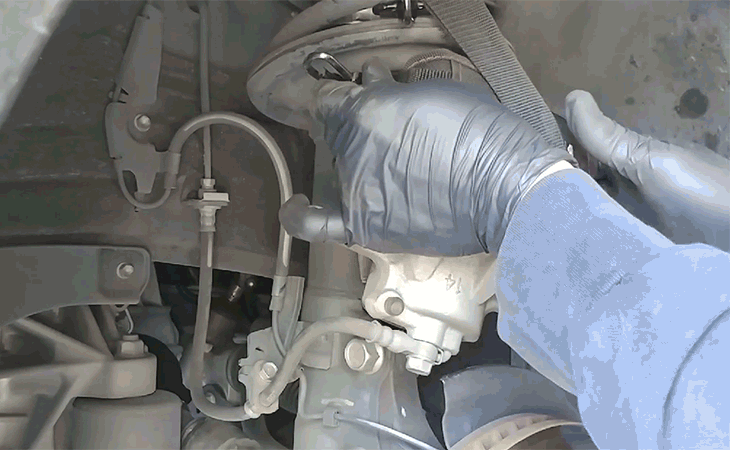
After unscrewing the caliper, move it away from the brake rotor. Note that the caliper on the vehicle is still attached to the brake pipe. So do not let go of the caliper under any circumstances, without letting it hang on the brake hose alone. Carefully place the caliper on top of the brake disc and then use the strap to hang the caliper from it. Make sure the caliper does not fall off and is securely suspended from the strap. Remember, if the caliper suddenly falls off, it can damage the brake pipe itself and could end up costing you unnecessary money.
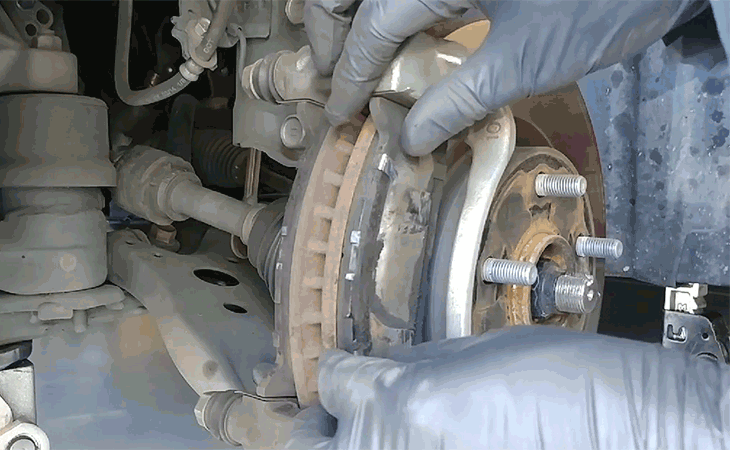
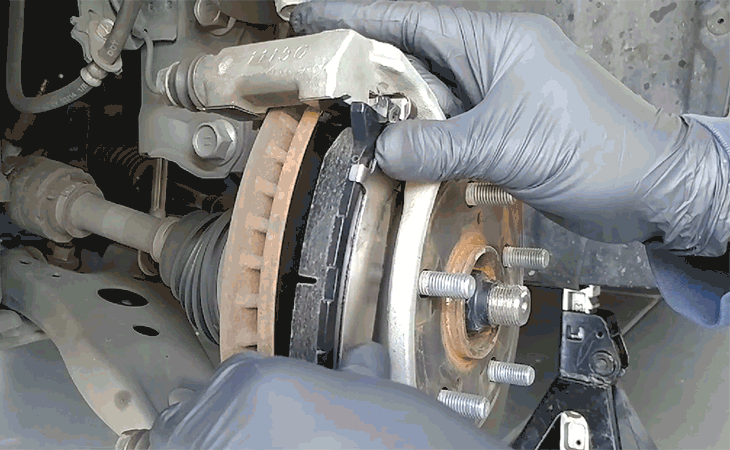
At this stage of the work you can safely remove the brake pads from the caliper. Just be careful not to damage the caliper itself, especially if you plan to use this braking component of the car in the future. If your brake pads came with extra hardware, remove the hardware by replacing it with new hardware.
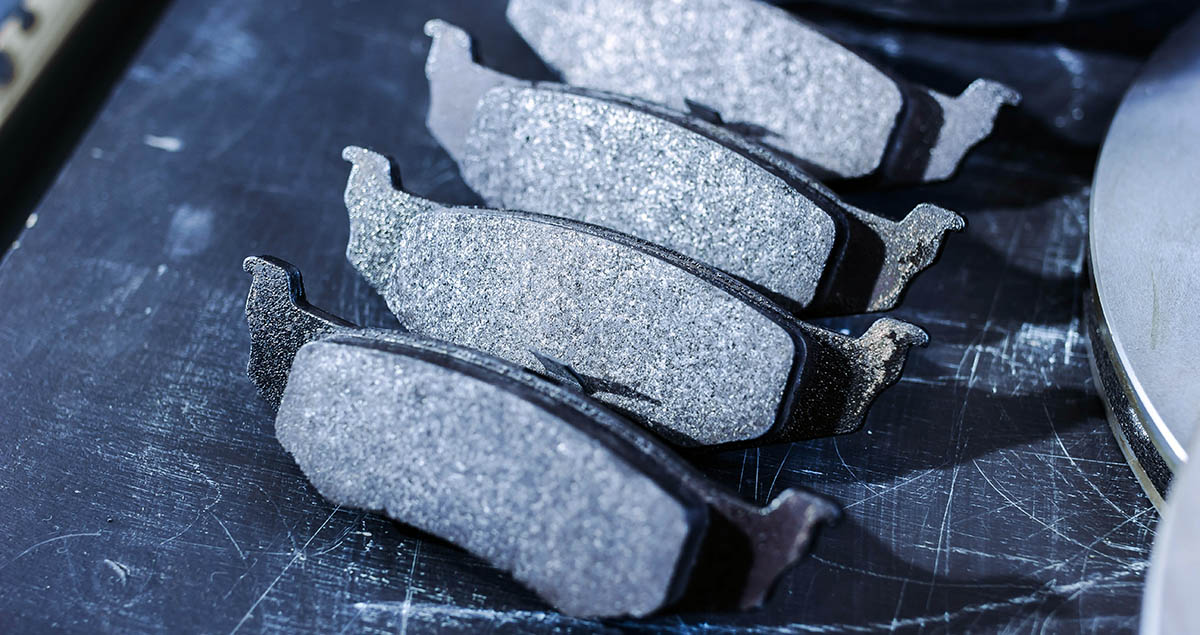
Step 3: Replacing the brake pads
Now, when the old brake pads are removed from the caliper you can safely install the new ones. First and initially, you need to apply brake grease to the back of these new pads. The grease will help you avoid unnecessary squeaking or whistling while braking. Please be careful not to apply this very grease to the front of the brake pads, because the effectiveness of your brakes is directly related to the friction between the front of the pads and the brake discs. Therefore, if you mistakenly apply lubricant to the front of the brake pads, you increase the potential risk of an accident in advance due to the reduced effectiveness of the brakes themselves.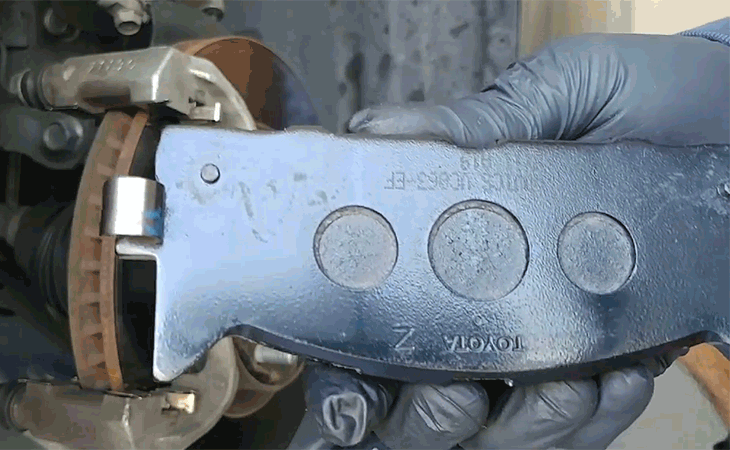
After applying brake grease, you can install the new brake pads in the same place where the old pads were previously installed. If you are doing this for the first time, there is one recommendation and precaution: do not replace the brake pads in all wheels at once, but replace them in one wheel first, making sure that everything is done correctly. This is a simple precautionary measure and will not be unnecessary for a beginner, so if you change correctly in one wheel, you can proceed to the other wheels, and so on.
Step 4: Extend the caliper piston itself
Next, after installing the new pads, there is a chance that you may not be able to fully assemble the entire caliper all together, as your caliper piston will automatically be set to the thickness of the old pads, which is noticeably less than the thickness of the new pads. Now using a special tool “G-clamp” or brake piston caliper compressor, adjust the caliper piston to the thickness of the new pads.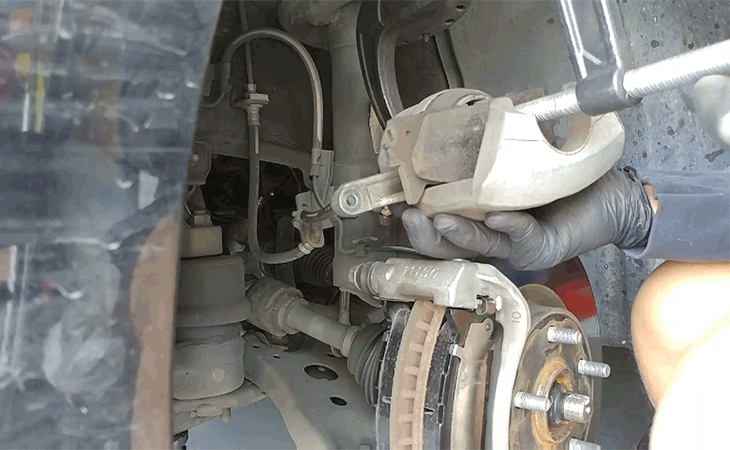
Use the caliper piston adjustment tool you can remove the piston that is interfering with the assembly of the caliper in one piece.
You may also have to bend the brackets of the new brake pads a bit if the top of the caliper itself is not going to fit back in any way.
Also, before clamping the caliper piston you have to unscrew the brake fluid reservoir, since squeezing the piston itself can cause the brake fluid level in the reservoir to increase. If, after replacing the brake pads, the brake fluid level is higher than the maximum level, the excess fluid should simply be pumped out of the system.
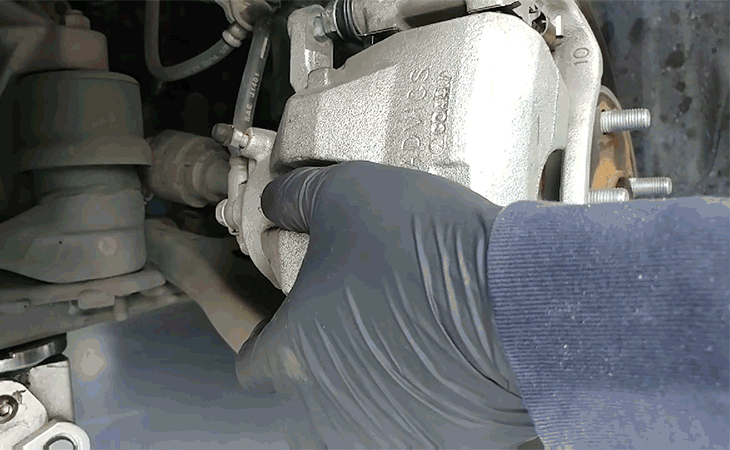
Once you have completely assembled the caliper, you can put it back in place by bolting it down with a socket wrench.
Step 5: Put the wheel back on the car
Double-check that you have done everything correctly and that everything is clamped so tightly and securely. Until you have done a complete check, it is best not to install the wheel on the car. After all the work is done, you can put the wheel on the car and tighten the wheel nuts, but not all tight. Place the jack under the car and raise the car. Next, remove the jack stand or stands and slowly lower the car onto the wheels.
Once the car is on the ground you can use a wheel wrench to tighten the wheel nuts all the way. Take extra care when you do this step and make sure in advance that all the wheel bolts are in place so they don’t twist and hold the car wheel securely.
Your safety depends on the reliability of screwed wheel bolts. After replacing the brake pads yourself, test the braking efficiency at different speeds. But do not choose the high speed of the car in this case. If you hear any squeaking or whistling, lift the car again to make sure that all parts of the car brake caliper are in place.
Sources:
- LifeHacker – How to Change Your Car’s Brake Pads
We do an efforts to find, research and recommend the best products. So, we may receive commissions from purchases that you make after following the links in our product reviews.